

Star Citizen Beginner's Guide 2023 (From a True Beginner) - Your First Hours as a New Player
Whether it’s your first wipe and you need to buy Star Citizen, understand how ship price, upgrades and pledges work or you need a refresher on taking your first steps as a new player in Roberts Space Industries’ (RSI) space sim MMORPG, this is for you.
I took this path as a beginner back in 2022, and it is the path I will take for the wipe with 3.18.
If you find this useful, I would truly appreciate it if you use my referral code to get into the game (STAR-55XV-DN4R). You’ll get an additional 5,000 UEC (permanent currency) too!
If you just want a quick step-by-step point A to B guide, click here.
Here it is, with easy-to-follow bookmarks. Good luck out there and we’ll see you in the black!
How to buy the Star Citizen game and what starter ship to choose

As you will hear Star Citizen (SC) fans lovingly(?) gripe about, SC is a largely crowd-funded open-world space sim massively-multiplayer online role-playing game. As such, your purchase of the game comes in the form of buying a game package.
Each package is a ‘pledge’ much like it would be for a Kickstarter, except this purchase comes with your ship and copy of the game. Ship purchases alone don’t include the game license. So, you choose your game package then buy it and get into the game. If you see mention of ‘Squadron 42,’ this is the campaign, single-player version of the game that is still in development and not yet available.
But we can make all of this simple: the cheapest package (read: pledge) is $55 USD – they often have sales, so keep an eye out – and there are a few options. I suggest that the best starter ship is the Aurora MR because it has enough firepower to get you pretty far into bounty progression, has a living/storage interior which means it will accommodate the majority of game activities and can easily launch you into earning enough for ship progression.
NOTE: You can buy any ship with in-game currency, you just have to grind it and if/when the servers are (seldomly) wiped, only your pledge(d) ships survive, meaning you’ll have to earn those in-game purchases again.
There are a few terms you will see when browsing for packages:
- What does Warbond mean? Warbond tags on a package means that this package is discounted and can only be purchased with real money, and not in-store credits. Store credits can be awarded from subscriptions, events, codes, other packages etc. Most often, the biggest perk aside from discount is a significantly longer ship insurance window where you can reclaim the ship for free in-game when it is inevitably destroyed.
- What is UEC, aUEC and REC? These are game currencies.
- United Earth Credits (UEC) are tied to a pledge and will be available to users for purchases every time there is a wipe. Think of it as ‘hard’ money to spend in-game and will carry over between wipes and when the full game goes live
- Alpha-United Earth Credits (aUEC) are the more liberal in-game currency that is used primarily in this alpha version of the game. Sometimes it can be rolled-back, given out, retracted or reset entirely in a wipe.
- Rental Equipment Credits (REC) is a currency earned in the Arena Commander (Ship Battles) to rent and use new ships, loadouts that don’t carry over into the open world game
Once you’ve decided on your package/pledge, create your account and make your purchase. Then complete the new player onboarding checklist to finalize it, download the game and get ready to enter the ‘verse!

Character creation and what starting or home planet and city to choose
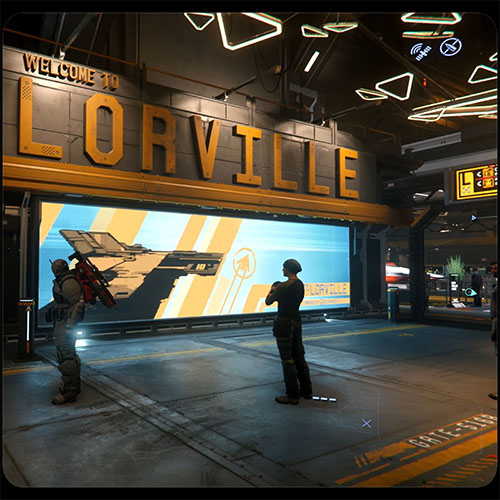
Make your unique character – you don’t see a whole lot of their face (unless you want to) but have fun with it. Then choose Loriville in the Hurston system as your home.
Loriville is centrally situated for ship fitting and close to Crusader, where we’ll spend most of our early days. Orison had an extremely high atmosphere that took about 15 minutes to leave but that has changed with 3.18 making it a bit more attractive as a home set point.
In any case, you can ‘bind’ your character to two locations:
- Your home planet, which doesn’t change and
- Your clone imprint, which is where you will respawn if you die 99% of the time you’re playing and you can change at any station/city – so this is the one that really matters long-term.
Once that’s all done, hit ‘Enter Star Citizen Universe’ to enter the Persistent Universe (PU)!
Fitting your ship, loadouts, weapons and more
Our early goal will be ship-combat bounty hunting missions. This will be your early bread-winner and is some of the fastest and most fun money to be made, which will then open access to buy new ships, new loadouts and get into other activities in the game loop.
When you spawn in on Loriville, follow the signs for Teasa Spaceport (you can follow the path I show in the video above too). The Automated Ship Organization Platform (ASOP) terminals to access and call your ships are just outside New Deal, where you’ll likely make all your future new ship purchases.
We’ll pause here and plan out your fitting and the equipment you’ll want to buy for your Aurora MR (or whatever ship you’ve purchased).
The first website you’ll want on speed dial for Star Citizen is a ship builder and loadout tool from Erkul Games. I’ve already created the Aurora MR loadout you’ll want, if you want to get straight to it. Click “Non stock items to cart” in the top right corner to create a shopping list of everything you’ll need that isn’t already on the base ship.
Then open the cart (top, top right hand bar) and click the places under the “Location” column to make them all look like this:

What we’ve done is list as many modules as possible in the fewest number of locations. Now, let’s get shopping!
NOTE: You may not have enough cash to get the full loadout. In that case, get the guns and gimbals first, then jump to the “Starting your career as an inter-stellar bounty hunter” section (below) to get earning!
Meanwhile, back at the ASOP terminal, find your stock AuroraMR and click Retrieve. Pay close attention to the hanger it’s docked at and head to the elevator. Board up and get ready to dive into space in your very own vessel.
Let’s get space shopping!
Set your course (check the video for a complete walkthrough) to Area 18 and refer back to the shopping list and locations we created with the Erkul tool. As you purchase and collect new modules, use the Mobiglass (character interface) to fit them to your ship, then delete them from your shopping list.
Hit the shops in order of: Area 18 (CenterMass, Dumper’s Depot), Banji Point (Platinum Bay), HUR L5 (Platinum Bay), then CRU L1: Ambitious Dream Station (Platinum Bay) – this is the shortest, linear route but also finishes in the Crusader system (CRU L1) where we’ll set a new home base to work from as a budding galactic bounty hunter!
Starting your career as an inter-stellar bounty hunter
Safety’s off now! It’s time to get to splashing bandits for cash. Missions that show on your Mobiglass are generated based on what system you’re in. For that reason we’re going to operate out of the Crusader system. Bounties here are easier to access, planets are easy to navigate and it’s close to a lot of major in-game activities, shops and POIs.
Make your way to CRU L1, specifically Ambitious Dream Station – fitting name huh? This is going to be ‘home base’ for a while and it has guns, armour, ship equipment, food – convenience. Dock in, make your way to the medical clinic and set your clone imprint at the insurance terminal. This way, when you die you’ll respawn here.
Once you’ve made this station home, we can set off after our first marks and join the bounty-hunting elite. Call your AuroraMR, mount up and undock as we head for Crusader to hunt.
NOTE: At the time of writing there is a bug that won’t allow you to plot a course to or target Crusader from Ambitious Dream Station. To get around this, plot a course to HUR L3 and quantum jump. A few seconds in, hold the quantum travel (QT) button to drop out of QT and then plot the course to Crusader normally.
When you’ve arrived at Crusader, open your Mobiglass and hit the Contracts panel. Make sure you complete the jump and if you don’t see missions, wait a minute or two and try again.
Select Mercenary>A Call to Arms – always make sure you have this mission as it gives you bonus (free) money for killing any wanted targets, on ground or in the air.
Then select Bounty Hunter>Bounty Issued For [Name] (VLRT). This stands for Very Low Risk Target and will be the first bounty missions you’ll see. Bounties are tied to factions, factions are tied to systems. The more bounties you complete in a system, the higher your rep will grow with that faction and the better and higher-paying bounties you’ll have access to.
For this reason, it’s best to pick a planet system and stay with it to get all the way up to the max level Extreme Risk Target (ERT) bounties. Your new AuroraMR with its fancy new loadout can easily carry you up to Very High Risk Target (VHRT) bounties – the second hardest/highest paying.

Enjoy the thrill of taking down that first mark and getting paid. From here it’s a bit rinse and repeat, zooming around the Crusader system, taking down bounties, collecting cash and gaining rank and higher jobs/rewards with the Crusader Security faction.
If and when this inevitably get’s repetitive, check out my YouTube channel and the blog for new guides and overviews of the dozens of other ways you can earn cash, explore and experience the vast space of Star Citizen.
Otherwise, read on for helpful resources, general good tips, tricks and need-to-knows, as well as a bullet-point step by step version of this guide.
Don’t forget to follow me/subscribe on YouTube, Twitch, TikTok and Insta for tons of gaming content for Star Citizen, Escape From Tarkov, Apex Legends, Warzone and more new game releases and reviews.
Helpful websites and resources for Star Citizen used in this guide (or not)
Star Citizen Tools (Wiki) – Community led and run all-inclusive SC database
Erkul Games – Star Citizen Ship Builder and loadout manager
SC Trade Tools – Variety of Trade, Mining and Commodities tools and planners
UEX Refining and Trade Calculator – and Refining, mining and resources farming platform
General tips and tricks on how to play and evolve in Star Citizen
- Know what you’re getting into – the game is still in development. Lots will change, bugs will happen and you may feel like you’ve lost time if something bad happens. Focus on the experiences and enjoy the ride – commit to the experiences, not the ‘stuff’ because the ‘stuff’ can get wiped, rolled-back or just blip away but it IS VERY rare.
- Have a goal when you go into game. Whether you’re focused on exploring new locations, or earning as much cash as possible or trying a new mission type. Have a reason and a short-list of objectives for each session. This will prevent you being lost in the open-world-ed-ness of the game and the depth of its mechanics
- Take it in bite-sized pieces. There is a LOT to learn. Choose one ‘thing’ like learning to fly OR bounties OR mining OR trade etc. and learn it before moving on. Don’t try to drink from the firehose and tackle everything at once.
- Join an organization and lean into the community! Star Citizen has one of the best gaming communities I’ve been a part of. Use general chat, meet people and ask for help. Everyone has been through it and most will be more than happy to help out. There are asshats in every community and game, of course, but hopefully you’ll encounter far more good than bad!
Point-based step-by-step quick-start version of this guide
- Create an account and sign up at robertsspaceindustries.com then complete the new player onboarding
- Select the AuroraMR game package and make sure it includes the “Star Citizen Digital Download” – Game Package, not Ship only
- Download the installer, install and launch Star Citizen with your account (used to purchase)
- Create your character and set your home to Loriville, Hurston
- Use the Erkul Gaming site to plan and build this AuroraMR
- Visit the shops in this order to buy and fit your ship: Area 18 (CenterMass, Dumper’s Depot), Banji Point (Platinum Bay), HUR L5 (Platinum Bay), then CRU L1: Ambitious Dream Station (Platinum Bay)
- Set your clone imprint (bind) to the Medical Clinic (Insurance Terminal) at Ambitious Dream Station in CRU L1
- Mount up in your newly fitted AuroraMR and leave the station. Plot a course for Crusader – this is where you’ll focus on your early bounty-hunting career
- Take the bounty missions from your Mobiglass console (Contract Manager) in order of VLRT, LRT, MRT, HRT, VHRT choosing the higher missions as they unlock
Enjoy newfound wealth, infamy and a bright horizon before you as the verse’s newest bounty-hunter. Oh and…
- Like, subscribe and share @TwinsticksAndTies with a friend where these fine socials are found:
Don’t hesitate to hit me up, DM me with any questions or jump in stream M, W, F 6amET/11amGMT and I’ll look forward to seeing you in the ‘verse!


